DRAFTSIGHT has been introduce to the markets, as a smart alternative for the drafting user. The software itself, not only come with a familiar UI, it also come with a more user-friendly way to perform the drafting operation in DRAFTSIGHT. As we know that, DRAFTSIGHT is one of the products from Dassault Systems, some of the command in the software, more or less similar on what we use in SOLIDWORKS.
So, today, we going to walk through the basic of DRAFTSIGHT, we going to focus on dimension tools and the layer properties. To get to understand how this feature works, and in the same time, allow you to compare the difference between the DRAFTSIGHT and the existing drafting software that you using.

In DRAFTSIGHT, the dimension tools come with different type and different criteria to apply dimension base on situation that you see fit. Let us go through to the very basic dimension tools, the point-to-point dimension tools. This dimension tool actually is the simplest one by selecting two points in DRAFTSIGHT. However, you will have to define the type of dimension before you using it. Example, if you wish to create linear dimension, and you accidently selected angular, the point that you selected, will always be the create angle-dimension, instead of the length between the two points. Therefore, you will have to be clear which measuring options you need to create the next dimension.

Point-to-point dimension tools, you need to select the first point, followed with second end point to create dimension.

You need to pre-select the type of dimension you going to use for the dimension.
Followed up next, will be the smart dimension, this function is quite similar for those who used SOLIDWORKS smart dimension before. Smart dimension will direct recognize the entities shape and behaviour. So, you do not have to pre-select the dimension type then create dimension, which save up a lot of time to create dimension in your drawings.

Smart dimension provides more easier way of doing dimension, and faster compared to the basic point-to-point dimension.
The third tools, will be the auto dimension tools. Auto-dimension tools will be a bit unique, instead of select the entities one by one, the feature auto generate dimension for you in group of entities. By selecting multiple of entities, and include them in the dimension bounding box in DRAFTSIGHT. After that, click on the auto-dimension, and select the box of dimension that we created earlier.

Pre-select all the entities and define them in bounding dimension box.
The function will let you define the baseline reference. The base line reference allows you to define the starting reference for your dimension. It will create all the necessary dimension needed for the entities base on the baseline reference we select in the options. Once dimension is created, you can do some minor adjustment on the dimension position base on your personal reference.

The baseline reference, allow you to select the start reference line or points, so all the dimension created will start from the base reference line.

The auto-dimension tools will show you the preview, before you continue with the auto-generated dimension.

You still able to make some minor adjustment, to tidy up all the dimension positions.
For my personal record, I prefer the smart dimension and auto dimension. The flexibility of create dimension from these tools will greatly speed up my dimension task in DRAFTSIGHT. It is simple to use, and fast. When we talk about drafting effectiveness, we prefer speed and maximum efficient on doing drafting task in the software.
Using colours to group up or categories entities has been a standard practice for drafter. And you are right, DRAFTSIGHT do come with layer features, and it quite similar you seen and used in another cad.
So, let us get into it.
The layer properties can always be found at the home command bar. By accessing the layer properties, allow you to add new colour layer, rename, and define the colour you want to define the entities.

Layer properties, allow you to manage, edit, and create different layers in your drawings.
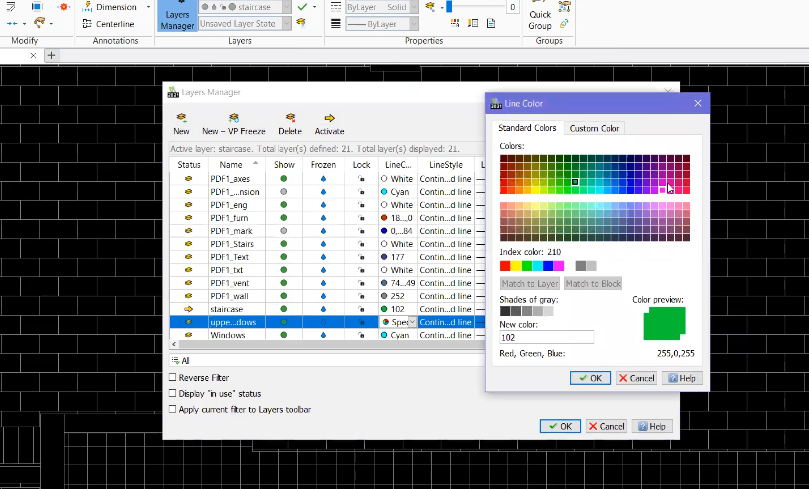
Colour palette, and flexibility to modify, allow you to create the unique layer colours to differentiate the entities.
How can we change the colour of the entities? Directly select or highlight the entities you want to change colour in DRAFTSIGHT. After highlighted the entities, click on then green icon to change the layer colours, make sure you select the correct layer for the entities.

Once you selected the entities, can direct change the colour base on the options available on the layer selections (Make sure you select the correct colour and name for the highlighted entities).
How does the layer properties help in drafting?
Beside categories the entities into different group. It allows you to temporary hide the entities to continue drafting. Which provide more flexibility when come to creating and editing the entities in your drawings.
You can show or hide the entities any time, to ease your drawing process in DRAFTSIGHT.
Stay tune on our blog page, we will always bring you the interesting knowledge on our solutions.
Stay tune for more.
-Henry Chai, Application Engineer, IME Technology Sdn Bhd