
Did you know that every SOLIDWORKS purchase is included with powerful design automation tools which we call as DriveWorksXpress. In this blog, I am going to show you how to start using it and how to automate your modelling process.
Basically, DriveWorksXpress is an easy to use tool that allows you to automate repetitive design tasks. It is a rule based tool that will allow you to create multiple versions of your SOLIDWORKS Parts, Assembly’s & Drawings, quickly and accurately. DriveWorksXpress works by capturing information from your existing models. That information (which can consist of Dimensions, Features and configurations) can then be controlled by a series of rules. These rules can be controlled from a simple input form, so that all you need to do is put the details in for the new variations, and then DriveWorksXpress will create them for you.
The input form can be reused as many times as needed, each time creating a brand new set of files and update automatically their relevant drawings.
Let explore together on how to start using DriveWorksXpress. We will go thru the concept how to use this rule based tools to help you and your design team perform better using SOLIDWORKS.
To understand the concept on how to use DriveWorksXpress, we will use this Box model as our case study. This Box will represent the general information that we can control (dimension & feature) and use it to create new configuration or variation in matter of second.

Step 1: Activated the DriveWorks
First, you need to activate the DriveWorksXpress features under Evaluate tab in SOLIDWORKS. Or you can search under option Tools> Xpress Products > DriveWorksXpress.


For those who first time click this feature, it will prompt out an Enable DriveWorksXpress asking to insert product code. You can just click the My.solidworks.com/xpress link and it will bring you to the SOLIDWORKS website where you can grab the product code and paste it to the empty box, then click OK.

Once DriveWorksXpress is loaded, it will appear at task pane right side of your screen.
Step 2: Create database
For the 1st tabs, we need to create new database for our project. This will be the files that contain all the rules we create and link to the part/assembly/drawing files. To create new database, click Create/Change Database and locate where you want to save the database file.

Step 3: Locate the part files
Then move to 2nd tabs, we will browse and locate where the part files we want to use for DriveWorksXpress. For this step, I can choose to Browse and find where I save the Box part file or I can just select option Use Open Model if I already open the part in SOLIDWOKRS graphic area.

Step 4: Captured Models
Next for 3rd tabs, we will capture all the information that we wish to control in this project. For this model, I want to change the height, width, length, size of fillet and the depth holes. There will be 5 variable we will capturing for this Box model. To begin capturing the information, you can select Dimensions and Features group section, click on the dimension, rename it and click Add. Rename is optional but it very useful later in the process to make sure you select and link the correct dimension.
Repeat this step to capture all 5 variables.


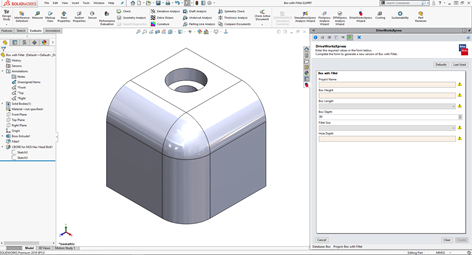
Step 5: Create Form
At 4th tabs of DriveWorksXpress, this is where we will start to design a form to collect requirement for new models. The input we can set as text box, numeric text box, drop down, spin button or check box.

Step 6: Create Rules
On the 5th tabs is where the rules needed to set up to link all the captured information with the input form created in the previous step. You need to solve all the red/missing rules in the summary task pane as shown.


Step 7: Test run
Once all the rules are created, you’re set to go and test out your project. The form you created on the step 5 now shown on the task pane. You need to fill in the form and click Create. It will automatically modify the input parameter from the form and create a new model based on the original model that was created.
If you miss anything, here the overall video on how to do the setup:
Here some real-life design application where you can fully utilize this design automation tools in your organization:
In conclusion, DriveWorksXpress work brilliantly with your repetitive design to generate new version of your SOLIDWORKS parts, assemblies and drawing in matter of seconds. Its just one-time setup and you can run again and again without have to wasting time to manually edit one by one. Its also can help eliminate errors while do all those design changes.
To explore more about DriveWorksXpress, please contact our technical support and we will happy to help you.
Until we meet again on next article!